Thursday, July 5, 2012

Sunday, April 8, 2012

Hoppy Easter! Next Year... {Gail}

I love these cotton webbing
Happy Easter embellishments!
Happy Easter wishes and blessings. I love this  sign that spring has arrived. Even here in Western WA where the rains and gloomy weather hang on, we usually have something flowery blooming by Easter. It just raises your spirits so much!  


Today we had a gloriously warm, dry, sunny, everything's-blooming kind of day. I am still smiling from the sheer beauty of spring here.


Let's do some crafting!


I always am most inspired, not before an event or holiday, but inconveniently DURING or setting up for an event or holiday. 


The bag of Jelly Beans contains
loose paper jelly beans
that move around!
So today, when I decided not to crawl into the attic for my 19 year old son's Easter basket in order to throw some candy at him (figuratively speaking, but not ruling out the literal;) ) I spent 40 of the 60 minutes I was supposed to be getting ready for dinner making an Easter treat bag with my "electronic die cutting machine."  


I made another one after dinner to show you the steps I took, since I think it turned out pretty cute! 

They're a little different because I am incapable of doing the exact thing twice, but you are going to make the project your own anyway, right? Of course!


Add YOUR Easter sentiment
to the bunny side of the bag,
along with eggs.


Choose paper: bag, bunny and basket, grass, eggs.
I have a favorite cartridge that came with my machine, and it cuts a variety of bags and borders. Since Samantha has a bigger fancier version of mine, we've accumulated many more cartridges (!) but for this project I only used two old but popular ones. 

Cut out the bag; the orange bag has the top serrations trimmed off.

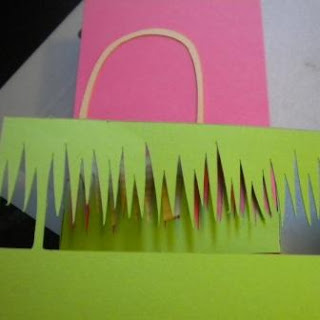
Cut out the grass.

For pink 4 1/2" bag, I used exactly two 1 1/2" grasses to go around the base  
...plus another to line the basket with "Easter grass" if you want
Orange bag is 5 1/2", with one 2" grass.  


Cut the bunny and basket:
measure the finished height of the bag, and cut 1/2" or so smaller.
Pink 4 1/2" bag uses 3" bunny/basket.


Cut egg shapes by hand -- start with half a heart. Start with a large one the first time. They sometimes keep shrinking ;)


Hold the large curved end and trim the pointy part off to form the small curve. Use small scissors. You don't have to even out all the jags as much as you think!


Tools, supplies, and pieces. 

Prep the grass by inking, distressing, whatever you prefer. Prep the basket and bunny by highlighting, distressing, etc. On the orange bag's grass, I used a Distress Ink pad; on the rest I used Tsukineko Brilliance and Chalk Dew Drops. I love Dew Drops. I have a LOT of Dew Drops :)  

Score and assemble the bag.
I grabbed a Marvy Le Plume and scribbled some basket texture with the brush end. 
Tuck the basket into the grass with no adhesive. Use a drop of glue or a glue pen to anchor the top of handle only.

Use the grass off-cut  to make the Easter grass.
Create your Easter basket grass.
Tear two pieces of the off-cut that will fit inside the basket; taper the bases. 
Score and curl the tips of one piece. 


Fill your Easter basket!
Tuck grass behind basket with adhesive on the UNDER side; position and press into place.
Tuck shaped piece of grass into basket with adhesive on UPPER side; position and press into place.
Use glue or glue pen and the help of a tool (toothpick, etc) to put eggs in place.
Add glue under the edges of the basket if you wish.


Since I was making this orange candy bag for my son, I only added this small, no-pink puffy butterfly. :) 


This Easter basket could use a fun bow, or a bit glitzy butterfly perched on the handle, don't you think? 


Tuesday, March 27, 2012

{Sam} Monkeying around with...

An assortment of crafts!!  Starting with a sock monkey hat I'm making for my soon-to-be born nephew!  He's got a little sock monkey toy and I'm going to take photos of him when he is born and thought it would be super cute if he had a matching hat!  It's still a work in progress (I only started it last night), but the basics are there!  I'm going to attach some ear flaps, the ears, a red pom pom on top and the face!!  I'll make sure to post a finished picture when it is done!


The second project requires a tiny bit of back story...
I used to work at a craft store.
Said craft store occasionally threw away fixtures when they were no longer needed.
Said craft store couldn't give them away instead, but they could sell them to me for a dollar :D
Enter: paper racks.


They keep my scrapbook paper nice and neat and color coordinated.
Enter husband losing space in the hobby room.
Exit... husband giving up hobby room so it could become full time scrapbooking and photography room.
Enter a couple other things, and then Christmas time...
Ornament Holder = Jackpot!!


I know it doesn't look like much yet, but in the next few weeks it's about to become the most amazing sticker holder.  EVER.

Step 1: Disassemble and Sand.
Step 2: Stay tuned!


Side note: While at the craft store this week I stumbled upon these beauties!!  I swear they were singing my name!  I think the colors are magnificent: bold, but still seeming soft because of the lighter parts and the fuzziness!  I LOVE the texture of them.  I think they are about to become hats and cocoons for props!  :)


Unless anybody has any better suggestions for me??
Let me know what you think in the comments below!!
-Sam

Thursday, March 22, 2012

Soup-a-Thon! {Sam}

2 Days.
2 Broths.
2 Soups.
1 Chili.
20+ Freezer Meals.

The Cookbook.

Start of Day 1. The Vegetables.


Start of the Vegetable Broth.


Simmering the Vegetable Broth.

Straining the Vegetable Broth.


Cooling the Vegetable Broth.

Beef Broth Recipe.


The Roasted Bones and Vegetables.


Simmering the Beef Broth.


Straining the Beef Broth. End of Day 1.


Start of Day 2.


Prep Work.  The Onions.  AKA... Tear Producer.


Prep Work.  The Roasted Garlic.


Prep Work.  The Chicken for Three Recipes.


The Spices for White Chicken Chili.


The Chicken Stock.


The Finished White Chicken Chili.  AKA... Lunch.


The Start of 'Creamy Roasted Garlic, Chicken and Mushroom Soup.'

Cooling 'Creamy Roasted Garlic, Chicken and Mushroom Soup.'  AKA... Dinner.


Prep Work.  Tom-Kha-Gai... AKA 'Thai Chicken, Coconut and Lemongrass Soup.'


Me.


The Finished Tom-Kha-Gai.


Me and Friend Jamie after 7 Hours Cooking Day 2.

The Finished Product, Jamie.


The Finished Product, Me.

Whew!  Look for Soup Ratings in a new permanent page soon!


- Sam

Saturday, March 10, 2012

A Few Little Somethings for You... {Gail}

I've had such a fun couple of weeks! I've quilted, doodled, scrapped, crafted -- and spent far too much time on the computer, jumping from blog to blog (to Pinterest) to blog, finding all kinds of new things to do! That's what happened with this first project tonight. An hour ago, I was cruising Pinterest and these cute little twine flowers showed up. As I was sitting at my "Sewing Command Center" (sewing machine table with my newly acquired laptop parked on it) and didn't want to get up *LAZY!* I reached for some heavy thread, then rumaged through my wastebasket for a piece of packaging chipboard -- voila! I followed the instructions at this fun blog! and ended up with this cute 1 1/2" flower!
I will definitely be making more of these!

Then, one sunny day ... we've actually had a couple this week, *shock!* ... I took a better picture of my fabric Valentines:
Way better lighting! YAY Sun!
On this sunny day, I was also taking a picture of the pieced quilt top for my Coffee "Obsession Quilt" Wallhanging (find early mention/photos here) that I was finally able to complete... relatively speaking. You'll notice that it seems really busy at the left and bottom and pretty boring on the top, right, and especially the middle. The next stage of development is to add the applique coffee mug, typography, and other embellishments to this piece before doing the quilting and finishing. I'm so excited to have it at this stage, because all the Obssession Quilting decision-making is over. I love it, but when it's time to be done, it's time to be done!
Imagine a coffee cup appliqued in the center brown area,
and some (secret for now) theme words splashed top and right.
And then, because I ended up with a leftover fabric-framed block, I turned it into a fun little potholder. It really should NOT take 6 hours to make a potholder ;) but with my laptop beside the sewing machine ~distraction!!~  and then I was forcing myself to machine stitch the binding down, which I hate because I'm bad at it so I must make myself practice and get better!! Right? Anyway. It's done, the back of the binding leaves a lot to be desired but it's done and I love it!


Leftover block framed in brown, I added borders,
curved the corners and the side,
and put on some binding. I'm gonna love
this potholder in my coffee-theme kitchen!
 
Back... do NOT -- I repeat -- do NOT even
look at those binding corners!
But isn't that cute fabric?

And then, today, I decided to check out my T-Juice fabric markers on an old tote bag, using some ZenTangle techniques and other general Gail-doodles. Blue is water-soluble marker, so it will go away.

~This~ is going to be a fun thing. Zentangle on fabric. All smudgy or bleeding has been done intentionally. Really ;)
Happy Crafting!
Gail